Static Timing Analysis:
Static timing analysis is a method of validating the timing performance of a design by checking all possible paths for timing violations without having to simulate .
No vector generation is required ,no functionality check is done


The static timing analysis tool performs the timing analysis in the following way.
1. False path: If any path does not affect the output and does not contribute to the delay of the circuit then that path is called false path.
2. Multi-cycle Path : Multicycle paths in a design are the paths that require more than one clock cycle. Therefore they require special Multicycle setup and hold-time calculations
3. Min/Max Path : This path must match a delay constraint that matches a specific value. It is not an integer like the multicycle path. For example:Delay from one point to another max: 1.67ns; min: 1.87ns
4. Disabled Timing Arcs : The input to the output arc in a gate is disabled.
For e.g. 3 input and gate (a, b, c) and output (out). If you want you can disable the path from input ‘a’ to output ‘out’ using disable timing arc constraint.

In the above fig its very clear that for clock path the starts from the input port/pin of the design which is specific for the Clock input and the end point is the clock pin of a sequential element. In between the Start point and the end point there may be lots of Buffers/Inverters/clock divider.
Clock path may be passed trough a “gated element” to achieve additional advantages. In this case, characteristics and definitions of the clock change accordingly. We call this type of clock path as “gated clock path”.
As in the following fig you can see that

LD pin is not a part of any clock but it is using for gating the original CLK signal. Such type of paths are neither a part of Clock path nor of Data Path because as per the Start Point and End Point definition of these paths, its different. So such type of paths are part of Clock gating path.

As you know that the functionality of set/reset pin is independent from the clock edge. Its level triggered pins and can start functioning at any time of data. So in other way we can say that this path is not in synchronous with the rest of the circuit and that's the reason we are saying such type of path an Asynchronous path.
Why is timing analysis important when designing a chip?
Timing is important because just designing the chip is not enough; we need to know how fast the chip is going to run, how fast the chip is going to interact with the other chips, how fast the input reaches the output etc…Timing Analysis is a method of verifying the timing performance of a design bychecking for all possible timing violations in all possible paths.
Why do we normally do Static Timing Analysis and not Dynamic Timing Analysis? What is the difference between them?
Timing Analysis can be done in both ways; static as well as dynamic. Dynamic Timing analysis requires a comprehensive set of input vectors to check the timing characteristics of the paths in the design. Basically it determines the full behavior of the circuit for a given set of input vectors. Dynamic simulation can verify the functionality of the design as well as timing requirements. For example if we have 100 inputs then weneed to do 2 to the power of 100 simulations to complete the analysis. The amount of analysis is astronomical compared to static analysis.Static Timing analysis checks every path in the design for timing violations without checking the functionality of the design. This way, one can do timing and functional analysis same time but separately. This is faster than dynamic timing simulation because there is no need to generate any kind of test vectors. That’s why STA is the most popular way of doing timing analysis
Dynamic Vs Static STA

Basic Definitions
* clock : It is a signal in the design in respect to which all other signals are synchronized. There can be multiple clocks in design.
1) Setup Time:
- Setup time is the minimum amount of time the data signal should be held steady before the clock event so that the data are reliably sampled by the clock. This applies to synchronous circuits such as the flip-flop.
- In short I can say that the amount of time the Synchronous input (D) must be stable before the active edge of the Clock.
- The Time when input data is available and stable before the clock pulse is applied is called Setup time.
2) Hold time:
- Hold time is the minimum amount of time the data signal should be held steady after the clock event so that the data are reliably sampled. This applies to synchronous circuits such as the flip-flop.
- Or in short I can say that the amount of time the synchronous input (D) must be stable after the active edge of clock.
- The Time after clock pulse where data input is held stable is called hold time.

3) Slack:
- It is difference between the desired arrival times and the actual arrival time for a signal.
- Slack time determines [for a timing path], if the design is working at the desired frequency.
- Positive Slack indicates that the design is meeting the timing and still it can be improved.
- Zero slack means that the design is critically working at the desired frequency.
- Negative slack means , design has not achieved the specified timings at the specified frequency.
- Slack has to be positive always and negative slack indicates a violation in timing.
4) Required time:
The time within which data is required to arrive at some internal node of the design. Designer specify this value by setting constraints.
5) Arrival Time:
The time in which data arrives at the internal node. It incorporates all the net and logic delays in between the reference input point and the destination node.
Setup Slack = Required time - Arrival time
Hold slack = Arrival time - Required time
6) Setup Slack:
Amount of margin by which setup requirements are met.
TCL = Total combinational delay in a pipe-lined stage
TRC = RC delay of interconnects
TC-Q = Clock to output delay
Tarrival = Arrival time (at node)
Tcycle,min = Minimum Achievable clock cycle
To meet the setup requirements the following equation must be satisfied.
Tslack,setup = Tcycle – Tarrival - Tsetup (For all Paths )
Here Tarrival= TCL + TRC + TC-Q
7) Hold Slack:
Amount of margin by which hold time requirements are met.
Tarrival >= Thold
Tarrival – Thold = Thold,slack
Thold,slack = TCL + TRC + TC-Q - Thold
Tarrival >= Thold
Tarrival – Thold = Thold,slack
Thold,slack = TCL + TRC + TC-Q - Thold
- The Negative value of Hold Slack means signal value propagates from one register to next, too fast that it overrides the old value before that can be detected by the corresponding active clock edge.
- The Clock frequency variation doesn’t effects the Hold time or the Hold slack so it is critical to fix the Hold time violations in a design prior to the setup violation if both exists simultaneously
8) Clock jitter:
Clock jitter is the amount of cycle-to-cycle variation that can occur in a clock’s period. Because clocks are generated by real physical devices such as phase-locked loops, there is some uncertainty, and a perfect waveform with an exact period of x nanoseconds cannot be achieved.
9) Source latency:
The delay from the clock origin point to the clock definition point in the design.
It is the insertion delay external to the circuit which we are timing. It applies to only primary clocks.
10) Network Latency:
The delay from the clock definition point to the clock pin of the register
It is the internal delay for the circuit which we are timing (the delay of the clock tree from the source of the clock to all of the clock sinks).
11)I/O latency
If the flop of the block is talking with another flop outside the block, clock latency (network) of that flop will be the i/o latency of the block.
12)Clock Skew:
It is the difference in arrival times of the capture edge at two adjacent Flip-flop pairs.

13) Positive skew
If capture clock comes late than launch clock then it is called positive skew.14) Negative skew
If capture clock comes early than launch clock it is called –ve skew.
15)Local skew-
It is the difference in arrival of clock at two consecutive pins of a sequential element.
16) Global skew-
It is Defined as the difference between max insertion delay and the min insertion delay of any flops.
It is also defined as the difference between shortest clock path delay and longest clock path delay reaching two sequential elements

It is also defined as the difference between shortest clock path delay and longest clock path delay reaching two sequential elements

17) Boundary skew-
It is defined as the difference between max insertion delay and the min insertion delay of boundary flops.
18)Useful skew-
If clock is skewed intentionally to resolve violations, it is called useful skew.
19) Recovery and Removal Time
These are timing checks for asynchronous signals similar to the setup and hold checks.
Recovery time is the minimum amount of time required between the release of an asynchronous signal from the active state to the next active clock edge.
Example: The time between the reset and clock transitions for a flip-flop. If the active edge occurs too soon after the release of the reset, the state of the flip-flop can be unknown.
Removal time specifies the minimum amount of time between an active clock edge and the release of an asynchronous control signal.
The following diagram illustrates recovery and removal times for an active low reset signal (RESET_N) and positive-edge triggered CLOCK
Timing Paths
The different kinds of paths when checking the timing of a design are as follows.
1. Input ports/pin --> Sequential element (Register).
2. Sequential element (Register) --> Sequential element (Register)
3. Sequential element (Register) --> Output Pin/Port
4. Input ports/pin --> Output Pin/Port

- STA Tool breaks the design down into a set of timing paths.
- Calculates the propagation delay along each path.
- Checks for timing violations (depending on the constraints e.g. clock) on the different paths and also at the input/output interface.
Timing Analysis is performed by splitting the design into different paths based on:
- Start Points
- End points
- Start points comprise of:
A clock, a primary input port, a sequential cell, a clock input pin of a sequential cell, a data pin of a level-sensitive latch, or a pin that has an input delay specified. - End points comprise of:
A clock, a primary output port, a sequential cell, a data input pin of a sequential cell, or a pin that has an output delay specified.
Calculation of the propagation delay along each path:
STA calculates the delay along each timing path by determining the Gate delay and Net delay.
1. Gate Delay : Amount of delay from the input to the output of a logic gate. It is calculated based on 2 parameters.
---Input Transition Time
---Output Load Capacitance
2. Net Delay : Amount of delay from the output of a gate to the input of the next gate in a timing path. It depends on the following parameters.
--Parasitic Capacitance.
--Parasitic Capacitance.
--Resistance of net
During STA, the tool calculates timing of the path by calculating:
1. Delay from input to output of the gate (Gate Delay).
2. Output Transition Time -> (which in turn depends on Input Transition Time and Output Load Capacitance)
Timing Exceptions
Timing exceptions are nothing but constraints which don’t follow the default when doing timing analysis. The different kinds of timing exceptions are
2. Multi-cycle Path : Multicycle paths in a design are the paths that require more than one clock cycle. Therefore they require special Multicycle setup and hold-time calculations
3. Min/Max Path : This path must match a delay constraint that matches a specific value. It is not an integer like the multicycle path. For example:Delay from one point to another max: 1.67ns; min: 1.87ns
4. Disabled Timing Arcs : The input to the output arc in a gate is disabled.
For e.g. 3 input and gate (a, b, c) and output (out). If you want you can disable the path from input ‘a’ to output ‘out’ using disable timing arc constraint.
Clock Path:
Please check the following figure: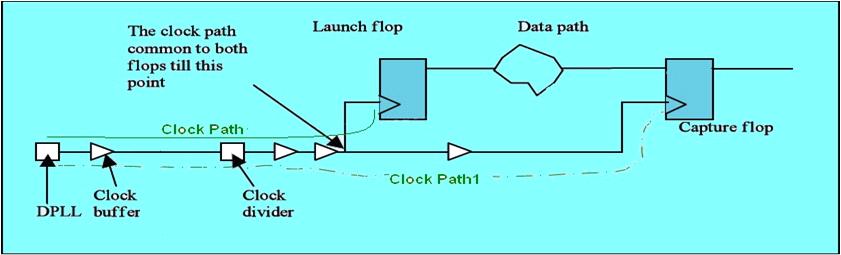
Clock Gating Path:
As in the following fig you can see that

Asynchronous path:
A path from an input port to an asynchronous set or clear pin of a sequential element.
See the following fig for understanding clearly.

Comments
Post a Comment